Thursday, June 29, 2017

Quack Shack

"Let's get ducks." 


Simple sentences can lead to ridiculously large projects.


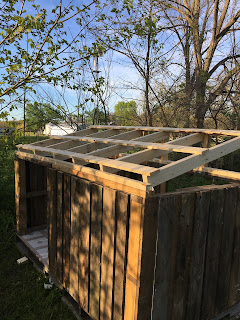
Our six domesticated ducks needed a coop near the pond for protection from predators and winter weather. We're not sure that ducks are a long term project for our farm, and we didn't want to invest a lot of money into their coop. Therefore, we made it out of scraps we found around the farm. I think the largest expense was hinges. It took some time, but it was very inexpensive.   

We started with recycled plywood atop two pallets as our base. Those pallets are sitting on flat paver stones to help keep the wood off the ground. The previous owner of our farm was involved in the Masons. Obviously a while ago based on the prices! Can you find the misspelling?


Next we covered the plywood with some peel and stick tile to make it easier to clean.


The walls are made of recycled pallets. We cut the boards off of one side of the pallet using a reciprocating saw and nailed them to the other side to cover the gaps and make it predator proof. We used scrap lumber to fill in the holes on the edge of the pallets.  


Our kids loved helping with this project.


My husband was busy with some other work and farm projects during this time, so the roof was my responsibility. I admittedly lack carpentry skills, and we weren't working from any plans to which I could refer. I think it was a compliment when Hubby told me that a whole pack of coyotes could jump on the roof and not get in.  


We purchased a couple of 2x4s for the rafters. I used some scrap metal for the roof and poultry netting to provide ventilation.  


We wanted two doors to help with cleaning and egg collection. Because the walls are only 40" tall, I don't want to get in there more than I have to. We leave the door toward the pond open during the day, but I don't think the ducks ever go in until we feed them at night.  


Tom and Huck painted the shack with some paint leftover from another project. 


Now  I think it needs a sign that labels it the "quack shack."


Tuesday, June 27, 2017

Finished Collage

Tada!

I finally finished the stairway collage.  It was 99% completed about 6 weeks ago but I needed one more mat.  Yep, that took 6 weeks. I'm much better at starting projects than finishing them.  


The "filler" photos are all black and white and the main 4 "anchor" photos are color.  I'm not sure I'll do that next time I change out photos, but it's fine for now.  

Now I'm off to work on some other unfinished projects.  


Wednesday, April 5, 2017

Oysters in a paint can

One man's trash is another man's treasure.  Everyone's trash is my 4yo's treasure.  Including this gem. Yes, folks, a gallon paint can of oysters in good ol' Indiana.  I am sure that was fresh...
 

I cannot imagine what that smelled like when it was opened.  I refuse to let anyone open it again for the same fear.  

Gag.

Stairway Collage


Where is Joanna Gaines and her seemingly unlimited budget when you need her, right?  We've been in the HWCV for almost four months now, and I have made some progress in decorating.  But I don't have an HGTV worthy "reveal."

In our previous home, I fell into the trap of wanting to fill the space, but sometimes after a few months regretted what I bought.  This time around I am committed to making choices of things that I really like.  Even if that means the space sits empty for a while.

One of my first projects was a stairway collage.  This was something I have really been looking forward to doing for a long time.  I've always loved the idea of a collage of family photos going up the stairway. It just feels homey.  

So, here is where I started:

I found four matching frames that I liked.  These are 11x14 frames that I found at Hobby Lobby, and they are the main unifying factor in our collage.  (I love this picture of my sweet tot!  Big shout out to Colleen Woodruff Photography for the great family photo session last fall.)

I ran a line of blue painters tape up the stairway so that I had a guide to keep things level, and traced the frames on white butcher paper and used painters tape to attach them to the wall.  This gave me a good idea of what other size frames I would need to complete the collage.  Then I looked at frames that we already had and pulled out anything that might work.  Next I made approximately 74 trips to Hobby Lobby, Target, Meijer, Goodwill, etc to find the other frames I wanted to use.  (I still have a big pile of stuff to return.)  

The large frames have a really dark stained finish, and it was going to be impossible to match them perfectly, so I decided to vary the palate.  I have some lighter wood and also some off-white frames.  

As I decided on each frame, I traced it on white butcher paper and taped in in place on the wall.  Then I rearranged them over and over and over.  I had a paper collage for about a month because I was busy, indecisive, and just that classy.


When I finally had my mind set, I started by hanging the off white frame in the middle and then moved out from there to keep things balanced.


I read blogs from people who used the paper collage to make their nail holes, but I am just not that exact or patient.  As a result, the space between frames isn't perfectly equal, but close enough. I also learned that it is difficult to "eyeball" what is level when hanging things along a stairway.  You will definitely need a level for this job.


On the landing at the top of the stairway we have our large family photo and a couple of photo ledges.  The large family photo was gifted to us, and it fits so perfectly!
  

I still haven't chosen mats and photos for the other frames. This one has an old photo in it and isn't even the correct orientation.  It kind of makes me giggle.


To see the final reveal, check back in a month...or three... Until then, I have a few other posts in mind to show you soon, including kids rooms and my wall of lies.


Monday, December 12, 2016

Almost Home

The HWCV is almost our home!  On Friday we received our occupancy permits from the county.  On Saturday we moved the heavy furniture with the help of some good friends.  Today I organized and cleaned. And we are going to move our mattresses and remaining furniture on Wednesday!  Our awesome contractor, Matt Allen Construction, has been finishing up the last few details, and it looks amazing.  I didn't get any photos today, but I will share the updates I have!

Stairs


Kids' Bedrooms and Bathrooms


Hmmm...I don't have a picture of the girl's bathroom.  It is super cute; I will try to get a picture up soon.  

Master Bed and Bath


Powder Room


Laundry Room


And...THE KITCHEN!  


I can't wait to show you the amazing pantry that is completed.  But it's going to be a while.  I have to move.  I should be packing.  Why am I still on the computer!?!  Excuse any typos...I'm not proofreading.  

Friday, December 2, 2016

LOVING it

We are aiming to move within the next two weeks, and so much changes each day at the HWCV. Soon, I will start posting whole room "reveals," but for now, here are some updates from the past couple of weeks that I am loving.

The master bath 

Our master bath may be one of my favorite rooms in the house!  I am really obsessed with this shower.  The shower heads will be installed soon!

GIANT vanity!  I can't wait to show you all the hammered copper mirrors I selected for this space.  


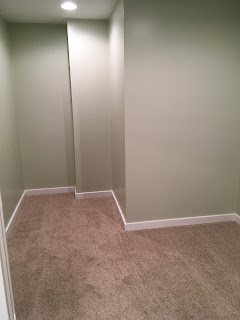
A peek into our master closet.  This is the same color green as the pictures above, but it looks so different in this picture.  And I am not sure any of these pictures actually capture the color.  

Kitchen

Our countertops were installed this week.  I am swooning over them!
  

Furniture

I've been painting furniture for Abby's bedroom.  I love this color combination!


Hardwoods

Hardwood floors should last us for the rest of our lives, so it is a daunting task to select a color, plank size, etc.  We chose "walnut hickory" from Lumber Liquidators.  It isn't a trendy wide plank, handscraped wood, and I am sure it isn't their current best seller.  But it has a timeless quality that I love.  It is hard to find a lighter tone without having red undertones.  And I prefer the grain pattern of hickory to oak.  I can't wait to get the furnishing elements in this room.  It's kind of drab with beige walls and brown floors.  But I am hopeful it will be wonderful once we get the furniture, curtains, rugs, and other elements in there.  


Until next time!