Thursday, August 3, 2017

Potch's Room

My son's nickname is Potch. This is a quick look at his bedroom and bathroom.


His bedroom still needs some attention.  We have wall shelves to go above his bed and dresser, we just haven't installed them.  In part because I am still wanting to upcycle an old bumper we found in the barn to use in his room.  And I'm not sure exactly where I want that.  I've purchased (and returned) so many different curtains.  For now, he has the ones from our old house.  The theme of this post should be, "good thing 8 year old boys don't really care."

Potch has three sisters. When we designed the house, we considered that one day he will not want to share a bathroom with them. We also considered using his room to double as an occasional guest room. Thus, he has a giant room with his own en suite bathroom. When we have guests, they use his room and he bunks with a sister. 

And this en suite bathroom tells a story of my fickleness.

We started with the inspiration to reuse an old blue retro sink that we salvaged from this house.  Here is the original inspiration.

I chose every fixture, color and flooring based on that sink.  But when we put it in, I hated it.  It was too small for the space.  It just looked sad.   

Thankfully, our contractor also hated how it looked, and offered to install another for us. I really like the look of pedestal sinks, but they typically aren't practical in a family bathroom. But I wanted to showcase the awesome tile floor, and since a boy doesn't require a lot of counter space, I chose a squared off white pedestal sink.  This is what it looked like right before we moved in.  

We stayed with a retro theme and found a really neat frameless tilting mirror for that space. Then we broke it during installation. Good thing 8 yo boys don't look in the mirror that often, because he didn't have one for months. I just didn't know which direction to go with the bathroom. Part of the problem was that I was not happy with the color I chose for the walls. It's not that I disliked the color; I used that same color in another room and like it. It just didn't work in that space. It was one of those colors that seemed to absorb light. 

This summer I finally got motivated. Yes, this was mostly because we had out of town guests coming to stay, and I hadn't even put up the towel hooks because I didn't want repaint around them. And I thought our guests might want a mirror above the sink. I repainted the walls the same color as his bedroom. I think design theory would suggest a different color, but I love the color and am happy with how it turned out.  Here is what his bathroom looks like now.  


He has a large linen cabinet for towels.  And the little shelf on his new mirror works great for his few accessories!  I think his shower curtain looks too feminine, but until I find something I like better, this one is fine.

And the towel hooks...Potch loves them!


Have you ever changed your mind about a room 23 times?  Leave your story in the comments below.  I'd love to read it!  

Thursday, June 29, 2017

Quack Shack

"Let's get ducks." 


Simple sentences can lead to ridiculously large projects.


Our six domesticated ducks needed a coop near the pond for protection from predators and winter weather. We're not sure that ducks are a long term project for our farm, and we didn't want to invest a lot of money into their coop. Therefore, we made it out of scraps we found around the farm. I think the largest expense was hinges. It took some time, but it was very inexpensive.   

We started with recycled plywood atop two pallets as our base. Those pallets are sitting on flat paver stones to help keep the wood off the ground. The previous owner of our farm was involved in the Masons. Obviously a while ago based on the prices! Can you find the misspelling?


Next we covered the plywood with some peel and stick tile to make it easier to clean.


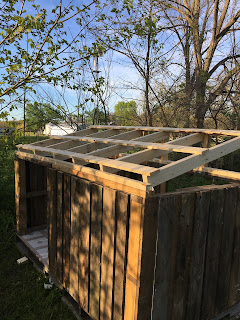
The walls are made of recycled pallets. We cut the boards off of one side of the pallet using a reciprocating saw and nailed them to the other side to cover the gaps and make it predator proof. We used scrap lumber to fill in the holes on the edge of the pallets.  


Our kids loved helping with this project.


My husband was busy with some other work and farm projects during this time, so the roof was my responsibility. I admittedly lack carpentry skills, and we weren't working from any plans to which I could refer. I think it was a compliment when Hubby told me that a whole pack of coyotes could jump on the roof and not get in.  


We purchased a couple of 2x4s for the rafters. I used some scrap metal for the roof and poultry netting to provide ventilation.  


We wanted two doors to help with cleaning and egg collection. Because the walls are only 40" tall, I don't want to get in there more than I have to. We leave the door toward the pond open during the day, but I don't think the ducks ever go in until we feed them at night.  


Tom and Huck painted the shack with some paint leftover from another project. 


Now  I think it needs a sign that labels it the "quack shack."


Tuesday, June 27, 2017

Finished Collage

Tada!

I finally finished the stairway collage.  It was 99% completed about 6 weeks ago but I needed one more mat.  Yep, that took 6 weeks. I'm much better at starting projects than finishing them.  


The "filler" photos are all black and white and the main 4 "anchor" photos are color.  I'm not sure I'll do that next time I change out photos, but it's fine for now.  

Now I'm off to work on some other unfinished projects.  


Wednesday, April 5, 2017

Oysters in a paint can

One man's trash is another man's treasure.  Everyone's trash is my 4yo's treasure.  Including this gem. Yes, folks, a gallon paint can of oysters in good ol' Indiana.  I am sure that was fresh...
 

I cannot imagine what that smelled like when it was opened.  I refuse to let anyone open it again for the same fear.  

Gag.

Stairway Collage


Where is Joanna Gaines and her seemingly unlimited budget when you need her, right?  We've been in the HWCV for almost four months now, and I have made some progress in decorating.  But I don't have an HGTV worthy "reveal."

In our previous home, I fell into the trap of wanting to fill the space, but sometimes after a few months regretted what I bought.  This time around I am committed to making choices of things that I really like.  Even if that means the space sits empty for a while.

One of my first projects was a stairway collage.  This was something I have really been looking forward to doing for a long time.  I've always loved the idea of a collage of family photos going up the stairway. It just feels homey.  

So, here is where I started:

I found four matching frames that I liked.  These are 11x14 frames that I found at Hobby Lobby, and they are the main unifying factor in our collage.  (I love this picture of my sweet tot!  Big shout out to Colleen Woodruff Photography for the great family photo session last fall.)

I ran a line of blue painters tape up the stairway so that I had a guide to keep things level, and traced the frames on white butcher paper and used painters tape to attach them to the wall.  This gave me a good idea of what other size frames I would need to complete the collage.  Then I looked at frames that we already had and pulled out anything that might work.  Next I made approximately 74 trips to Hobby Lobby, Target, Meijer, Goodwill, etc to find the other frames I wanted to use.  (I still have a big pile of stuff to return.)  

The large frames have a really dark stained finish, and it was going to be impossible to match them perfectly, so I decided to vary the palate.  I have some lighter wood and also some off-white frames.  

As I decided on each frame, I traced it on white butcher paper and taped in in place on the wall.  Then I rearranged them over and over and over.  I had a paper collage for about a month because I was busy, indecisive, and just that classy.


When I finally had my mind set, I started by hanging the off white frame in the middle and then moved out from there to keep things balanced.


I read blogs from people who used the paper collage to make their nail holes, but I am just not that exact or patient.  As a result, the space between frames isn't perfectly equal, but close enough. I also learned that it is difficult to "eyeball" what is level when hanging things along a stairway.  You will definitely need a level for this job.


On the landing at the top of the stairway we have our large family photo and a couple of photo ledges.  The large family photo was gifted to us, and it fits so perfectly!
  

I still haven't chosen mats and photos for the other frames. This one has an old photo in it and isn't even the correct orientation.  It kind of makes me giggle.


To see the final reveal, check back in a month...or three... Until then, I have a few other posts in mind to show you soon, including kids rooms and my wall of lies.